Showing posts with label recipes. Show all posts

Tuesday, April 17, 2018

Kneaded Rolls


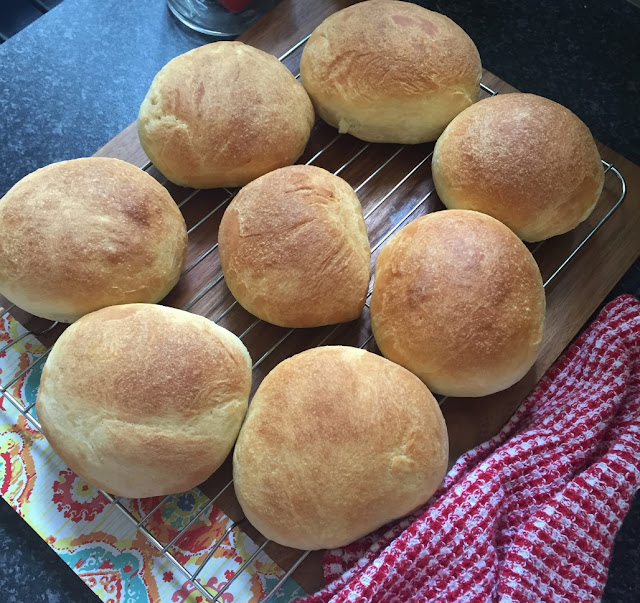
I shared my very first attempt at Burger rolls on my My Story accounts on Instagram and Facebook this past weekend. It was such a huge success and I had so many requests for the recipe that I thought it best to save it here and share it with you all together.
I am by no stretch in any way or form an artisan bread maker like so many of my foodie friends are but when there's a recipe that is simple to whip up, that even I can accomplish it, I have to share it with you all so that you can give it a go too.
Cause really... Who doesn't just love the delicious fresh aromas of bread baking?
I jot down recipes as I go along and often dont think to save where they came from, do you? So, just know that I do not take any credit for this particular one.


 As you may remember from before I am all about what is easy and my bread maker machine was just that. Until I discovered No Knead Bread! Now that poor machine stands and gathers dust. I also have found that I am not as scared of yeast as I thought I was. The perfect bread calls for yeast, water, salt and flour. THAT IS IT. If you have those ingredient you are on your way to never buying store bought bread again ;)
These rolls do take a bit of time from start until ready to serve but it is so very worth it. And the kneading time.. well, think of it as your time infusing each roll with love and all those special intentions that magickal cooking can manifest for you and your loved ones.
For me, it was time out of my day to do just that!

Kneaded Rolls

  • 1 tablespoon active dry yeast
  • 1/2 cup warm water
  • 1/2 cup milk
  • 1 large egg
  • 2 tablespoons oil
  • 2 tablespoons sugar
  • 1 teaspoons salt
  • 3 cups flour
  • 1 tablespoons butter
  1. In a large bowl, stir in the yeast and warm water and lit it sit until dissolved. (this should take about 5 minutes)
  2. In another bowl mix, whisk the milk, egg, oil, sugar and salt until combined.
  3. Add this to the yeast mixture and stir until combined.
  4. Add flour and stir until it becomes a shaggy mess like dough.
  5. flour your counter and roll dough out onto the counter and knead for about 10 minutes.
  6. The finished dough should be smooth and slightly tacky and spring back when you poke at it.
  7. Return dough to bowl and cover. Let it sit in a warm place in your kitchen until it doubles in size. This should take about an hour.
  8. Dust your counter top with flour and turn risen dough out onto it.
  9. Divide the dough into 8 pieces. Shape each one into a ball.
  10. Place your rolls on a baking tray and let them rise again. This should take about 30 minutes.
  11. Preheat oven until 200 degrees Celsius.
  12. Melt butter and brush it over each roll - this gives them that golden brown colour.
  13. Bake until golden for about 15 minutes.
  14. Let them cool to room temperature and enjoy.

Tuesday, March 27, 2018

Recipe for the Perfect Curry

I know it has been a while since I last updated. 

In the midst of Tristan leaving us for China and non-stop rain through the month, I honestly haven't had a spare minute to think. When I do, it's the fastest 5 minute share on our Facebook page or a flick of the forefinger through our Instagram feed. Both ever so quick and of course accessible on the go because they are loaded on my cellular. 

The mornings are certainly cooler and so much darker than before as with the early evenings. Today is even more so, thanks to the lingering cloud cover, that the kilo of beef curry cuts in the freezer beckon to be cooked up. And, I know I have the perfect recipe just for it. It has been patiently waiting for this perfect moment. Cold and cloudy with the chance of spicy aromas of Ginger, Cumin and Garlic and Cloves...


What You Will Need :
1kg of any type of Meat, Fish or Vegetable
Oil or Ghee for braising
Onion, Garlic, Ginger
Spices - Cumin, Coriander, Pepper Cinnamon and Cloves. 
Star Anise and Bay Leaves
Masala and Chilli powder
Tomatoes and Water or a couple of tinned variety.
and fresh Coriander to garnish.
 
Heat up your Dutch Oven pot (or any pot) with Ghee or Oil and braise about 2 Onions. Add Cumin, Pepper, Cinnamon and Cloves - about 1/4 to 1/2 teaspoon of each. You will eventually know which to add more of or less of as you go along and make more Curry dishes. Once golden, add Garlic and Ginger then your Meat, Fish or Vegetables and braise well. Sprinkle Chilli powder and half a teaspoon of Dhania powder (also known as Coriander), 2 teaspoons of Salt and the same of your brand of Masala. Again with the Masala and Chilli Powder I add tablespoons as my tribe are spicy hot humans. Maybe start off with a couple of teaspoons (or just one) and see how you go along. Braise all together then add Tomatoes and Water as needed. I add quite a few. In this recipe I added about 6 which I had blanched in boiling hot Water to help in removing the skins but you can use tinned Tomatoes too. I usually add a tin sometimes 2 depending on how saucy I want the finished meal to be. Throw in some Bay Leaves and a couple of Star Anise. Pop on the lid and let cook for 20 minutes on a low heat. 

Serve with Rice or Roti and Sambles.
Garnish with fresh Coriander Leaves.
Serve, Eat & Enjoy! 

Saturday, July 23, 2016

Beer Bread.


Bread is the staple of many today in South Africa, as it was in the past. I find that it’s a go to for toast with eggs (from our girls in the coop) in the morning for breakfast, sliced with cheese and variety of different toppings for lunches and even as fresh warm side-dishes with our evening supper. If we dont have bread in the pantry cupboard at all times – it's and absolute disaster. The boys lives just would not carry on further than that moment.


A couple of months back my Bread Making Machine went on the blink! Something to do with the turning thingie on the motor ma-gadget. Ok, so I was kind of lost when Rob tried to explain it all to me. So, the bits n pieces have been taken to a clever human who, when has a few moments in his busy day, will wind it or something. It’s been a while and said human is extremely busy. So, I have been trying my hand at a few handmade varieties.


Now, I know that most bread recipes call for hours of arm cramping... and kneading of dough, and then a whole long other waiting period of letting it all rise just to smash it all down again. But, frankly sweet people, this ol’gal just doesn't have the patience for that these days. The longest time I’ve spent waiting for a bread is for my One Pot Bread but that really doesn't have much leg umm arm work.


Beer Bread.


REALLY… what more do I need to say here? it's oh so quick and perfect as a side dish for those good ol’ traditional South African braais – right? And the man sure feels like he has contributed to the whole bread making process by sparing you one of his bottles of beer.


So, ovens on to 160 degrees Celsius to warm up while you busy yourself around the kitchen getting all your necessary ingredients and grease your loaf tin.


In your mixing bowl add 3 cups flour, 1 teaspoon salt, half a teaspoon bicarb (baking soda), 3 teaspoons baking powder and 2 tablespoons sugar.


(I then add a quick blessing… please note this is optional… *insert-twinkly-eye-sparkle-here*)


Now, pour in your fizzy beer and watch the magic bubbles. Fun – right?


Give it a good ol’ mix and then a quick ol’ knead and pop into your greased loaf tin. The whole shabam goes into the oven for 60 minutes and then... well.... wait. I'm sure there is plenty to keep yourselves all busy with  now, like clean up the mess (not always the most fun part).


Once done turn out to cool just a bit and then slice and slather with copious amounts of butter and OR (like I did) add my homemade caramelized onion jam!


Easy – right? Who said you couldn't make homemade bread? Let me know how yours turns out?


This delicious post is shared with the all the beautiful humans over at The Homesteader Hop.

Monday, May 16, 2016

One Pot Bread


One Pot Bread.... It really is! Ok except for the one bowl you mix all the ingredients in, this is truly a One Pot Bread recipe. Its so super easy, with just an over night resting period, and your family is going to love it!


I couldn't think of a better first recipe to share here... And, just a word of caution, once those aromas start wafting through the home, your specials will be lining up with the same questions every time...


WHEN IS IT GOING TO BE READY?


That my friends I will answer right now, before we carry on..... literally 35 minutes from the time that dough hits that oven.


So lets get to the recipe shall we.


3 cups all purpose flour

2 level teaspoons salt

1 level teaspoon instant yeast

1 1/2 cups water

*** cast iron pot with lid ***


Right, you got all of that?


In a bowl mix in your flour, salt and yeast. Add your water and stir with a wooden spoon. It should end up looking a little shaggy. Cover with cling wrap and slid to a safe spot on your kitchen counter and leave to rest overnight.


Then in the morning.... have a peek at your bowl and you should see that your dough has risen, almost doubled in size, and that there are tiny little bubbles everywhere. When you remove the cling wrap you can smell that yeast - right? Heavenly!


Switch your oven on and preheat it to 230 Degrees Celsius.


While your oven is getting all blistering hot turn the dough out on to a well floured surface and coat hands liberally with flour...I mean it - your really dont want to not coat them, it gets all messy and sticky... then tuck and turn the dough until it forms a ball. Cover the ball with cling wrap and allow it to rest for a bit.


Once the oven has hit that 230 Degree mark place your cast iron pot in for 30 minutes.


This is when you can go and pick a couple of herbs from the herb patch, check on the kids who have now started swinging dangerously from the new "swing" (which has been re-purposed from the jumpaleen) and this makes the dogs bark frantically on and on an on.... and on.. yell a little - then moan at Nugget our rooster as he tries to get amorous with the poor weathered looking egg laying, very broody girls AGAIN. And then... slowly meander my way back to the kitchen. That takes about half an hour.


Now, remove the very very hot pot and with floured hands carefully pop the dough in to it. Cut an X on the top with a sharp knife. Or in my case my sharp knife was in the dishwasher so I used my kitchen scissors. Cover with the lid and pop it all back into the oven for 25 minutes.

When the timer goes off, remove the lid, and bake for another 10 minutes.


Once done, turn out onto a bread board to cool... or as it is in my home... turn out onto bread board hand over bread knife and butter and allow the scavengers to consume!


There are times though, where I am left a slice to enjoy with an egg from the coop, Cherry Tomatoes off the vines and Basil from the herb patch.


Friday, May 16, 2014

Early Morning Pickings

Pietermaritzburg-20131116-03610
Early morning pickings….

Just after the early morning dew has evaporated, is the best time to harvest just a few of these beautiful petals for my Rose Water.
Rose water has been used in cooking and cosmetics for years.
Perfect for love and healing – ask Rob he is absolutely and completely in love with it.

Whippin up a batch is ever so easy – so you NEVER have to buy the horrid commercially made stuff again!!

All you need is your organic rose petals and distilled water.
Pop your petals in a small pan, add distilled water – just enough to cover the petals – and very gently on low let simmer away..
Slowly you will see the colour leave the petals.
Allow to cool then strain and bottle.
A fresh new batch… One carafe just for Rob and rest to be kept in the fridge.
The beautiful fragrances of love, happiness, patience…….. and romance are ever so delicately wafting through our home….

Just as a day of Venus, a day of love, should smell….. *sigh*…. Bliss I tell you

Love
Angie xxx
Related Posts Plugin for WordPress, Blogger...

The Blogger Tribe